Quickstart
Clever Cloud provides an automated hosting platform for developers. Deploy your app easily and launch dependencies without having to worry about the infrastructure set up. Follow this guide to get ready to deploy quickly as you learn the basics of Clever Cloud.
Create a Clever Cloud Account
The API of Clever Cloud uses OAuth 1 to perform authentication actions. There are two ways to signup to Clever Cloud: email or GitHub login.
The GitHub signup allows you to create an account or link your existing one to GitHub, in one click. This process asks the following permissions:
- Read your Public Key
- Read User Repositories
The “repository permission” is used to deploy your GitHub apps directly to Clever Cloud, with a simple step. If you need to give access to Clever Cloud’s API to a specific GitHub organization, you can do it here.
Go to the Clever Cloud Console and select the method you prefer.
Two Factor Authentication (2FA)
Clever Cloud supports 2FA. You can enable it here: https://console.clever-cloud.com/users/me/authentication
Please, backup your recovery codes, we won’t be able to restore access to your account if you lose access to your regular codes.
Deploy your code
What’s an Application on Clever Cloud
An application is defined on Clever Cloud by the following elements:
- a dedicated language/framework;
- a deployment method (FTP and/or Git);
- resources consumption (CPU, RAM, Disk…), depending on the language or framework used;
- an optional configuration file you may add to your project.
If one of these elements is missing, Clever Cloud can’t deploy your application properly (except the configuration file, optional in some cases).
How it Works
When you push an application’s code to git or via FTP, the platform receives it and checks the resource’s requirements. If they are complete, the deployment is launched. When finished and successful, the application is up and running.
The log system retrieves all output from the application and displays it in the logs tab of your application in the Clever Cloud console.
Supported Platforms
Create an Application Step by Step
In the Clever Cloud Console:
Select the organization
Choose the organization you want to deploy in from the left menu. At this point you must only have the Personal Space but you can create one.
Click on “Create an application”
Find it in the Organization Manager panel, at the top left of the left menu.
This starts the application creation wizard. If your account has been linked to GitHub, you can select a repository from your GitHub account.
If you want to deploy an application within a GitHub organisation, first grant the Clever Cloud API access to it.
Select the language
Choose the language or the framework you want to deploy.
Fine-tune your scaling configuration
Horizontal scaling is the number of instances that can run at the same time. Vertical scaling sets the minimum and maximum size the instance can be.
Name your application
Enter the name and the description of your application.
Optional steps
- The wizard will offer you to add an add-on to your application
- The wizard will offer you to add environment variables to your application
Choose How to Deploy
To deploy via Git, you need it installed on your machine. You can find more information on Git website: git-scm.com
Note: During the deployment, the .git folder is automatically deleted to avoid security problems. If you need to know which version is used on the server please use the COMMIT_ID environment variable.
Follow these steps to deploy your application:
Get the git deployment url in the application information page, which looks like:
git+ssh://git@push.<zone>.clever-cloud.com/<your_app_id>.git.In your terminal, go to your application repository. If you do not already track your app with git, start by typing:
git init
git add .
git commit -m "first commit"- Then, link your local repository to Clever Cloud by providing the Git remote url:
git remote add <remote-name> <your-git-deployment-url>- Push your application to Clever Cloud:
git push <remote-name> <branch-name>:masterYou can see your application logs in the dashboard to monitor the deployment.
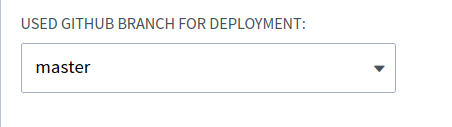
Once you have created your application with GitHub, each push on the master branch trigger a deployment. To deploy an other branch than master, go to the information panel of your application and select the default branch to use.
If you don’t find your repository in the list fetched from Github, a workaround is to unlink your account in your profile here : https://console.clever-cloud.com/users/me/information, remove Clever Cloud API from your Github Authorized OAuth Apps and link again your Github account to your Clever Cloud account.
Private GitHub repositories are also supported.
Caution: in GitHub, private repositories in an ordinary user account are an all-or-nothing deal: either someone has full read write access (i.e., they’re a collaborator) or they have no access.
However, if you set up an organization, create the repo under the aegis of the organization, and then add the collaborator, you have much more fine-grained control (including giving read-only access to a private repository).
You can deploy via FTP with PHP applications.
To deploy via FTP, you need an FTP software installed on your machine. Filezilla is one of them.
Deploy your application via FTP, create a FS Bucket with an ID matching your application’s ID. You will find the FTP credentials in the configuration tab of this particular FS Bucket.
More documentation about Filezilla.
An FTP application is automatically started once the application is created, even if no code has been sent.
Troubleshooting
Git ⋅ Remote is asking for a password
If the remote asks you for a password right after a git push attempt, this may be due to a SSH Key misconfiguration.
Add your SSH key to your profile here: https://console.clever-cloud.com/users/me/ssh-keys
The full tutorial about adding SSH key is here: Adding SSH keys
Git ⋅ Unable to resolve the reference master
You are probably trying to push from another branch. Remeber that:
- You can only push to the master branch for deployment. Trying to push to another branch will trigger an error.
- You cannot push a tag (which refers to a commit) to the remote repository. If you do so, no deployment will be triggered.
- In order to push to master from a non-master local branch, use this syntax:
git push <remote-name> <branch-name>:masterGitHub ⋅ Does not appear to be a git repository
You can’t directly push to an application created on Clever Cloud as a GitHub app: in this case, only the automatic deployment from GitHub is henceforth allowed.
If you try to push to Clever Cloud, as you would do for a non-GitHub app, you will get the following error :
fatal: '/data/repositories/<app_id>.git' does not
appear to be a git repository
Indeed, no git repository is created on Clever Cloud because the application is directly cloned from GitHub.
If you have to push directly to a repo in order to deploy an application (eg if you deploy from a CI), then create a non-GitHub app.
Manage your Application
There are many tabs available in the application’s menu on Clever Console:
- Information: General information about your application
- Scalability: Set-up scalability options
- Domain names: Manage custom domain names
- Environment variables: Manage environment variables
- Service dependencies: Link add-ons and applications
- Exposed configuration: Manage exposed environment variables
- Activity: Track last deployments
- Logs: Visualize application’s logs
- Metrics: Visualize application’s metrics
- Consumption: Visualize your application’s consumption.
Create your first add-on
Applications often requires one or more services in addition to the runtime itself. Add-ons are services you can use independently, or you can link them with your application(s). For instance, you may want to add a database or a caching system to your application or just have a database with no linked application.
An add-on can be shared by different applications to share data between them. It can be a database shared by two or three applications of your infrastructure for example, or they can be independent.
Most of the add-ons catalog is provided by Clever Cloud, but vendors are also allowed to provide services external to Clever Cloud (See how to integrate your SaaS with Clever Cloud)
Available add-ons
Clever Cloud provides multiple add-ons to work with your applications:
If your add-on:
Here we will assume you want to create a new add-on and link it to your application.
- Go to the Clever Cloud Console.
- Go to the organization in which you want to create the add-on, for example your personal space.
- Click on Add an add-on. This space let you create and configure the add-on according to your needs.
- Choose which type of add-on you want to create. See above the list of available add-ons and their corresponding documentation pages for further information on how they work.
- Select the plan you need for you add-on. You can find details about the pricing, the capacity of the add-on and other specifications on this page or in the corresponding documentation page.
- Choose with which application you want to link you add-on. Linking an add-on to an application will provide configuration to the application through environment variables. The environment variables provided by the add-on are available for use in the linked application. If you want to use your add-on alone, just don’t link it to any application.
- Choose the name of the add-on and the region where the add-on will be hosted.
- Click on the Create button.
The add-on will now be available in your organization, and corresponding environment variables will be available for the applications linked to the add-on you just created.
To link an already existing add-on with your application, just follow these steps:
- Go in the organization of your application.
- Click on the name of the application you want to link with your add-on.
- Go in the Service dependencies section.
- Select the add-on you want to link under the “Link addons” dropdown menu.
- Click on the Link button of the add-on you want to link to your application.
Add-on Billing
There are two kinds of billing:
- Per-month billing: Add-ons with fixed resources (storage, CPU and RAM)
- Per-usage billing: Add-ons based on consumption, like FS Bucket and Cellar
Manage your Add-on
Once an add-on is created, at least two tabs are available in the Clever Cloud console:
- Add-on dashboard: This screen provides and overview of your add-on and its options, depending on the type of add-on it is.
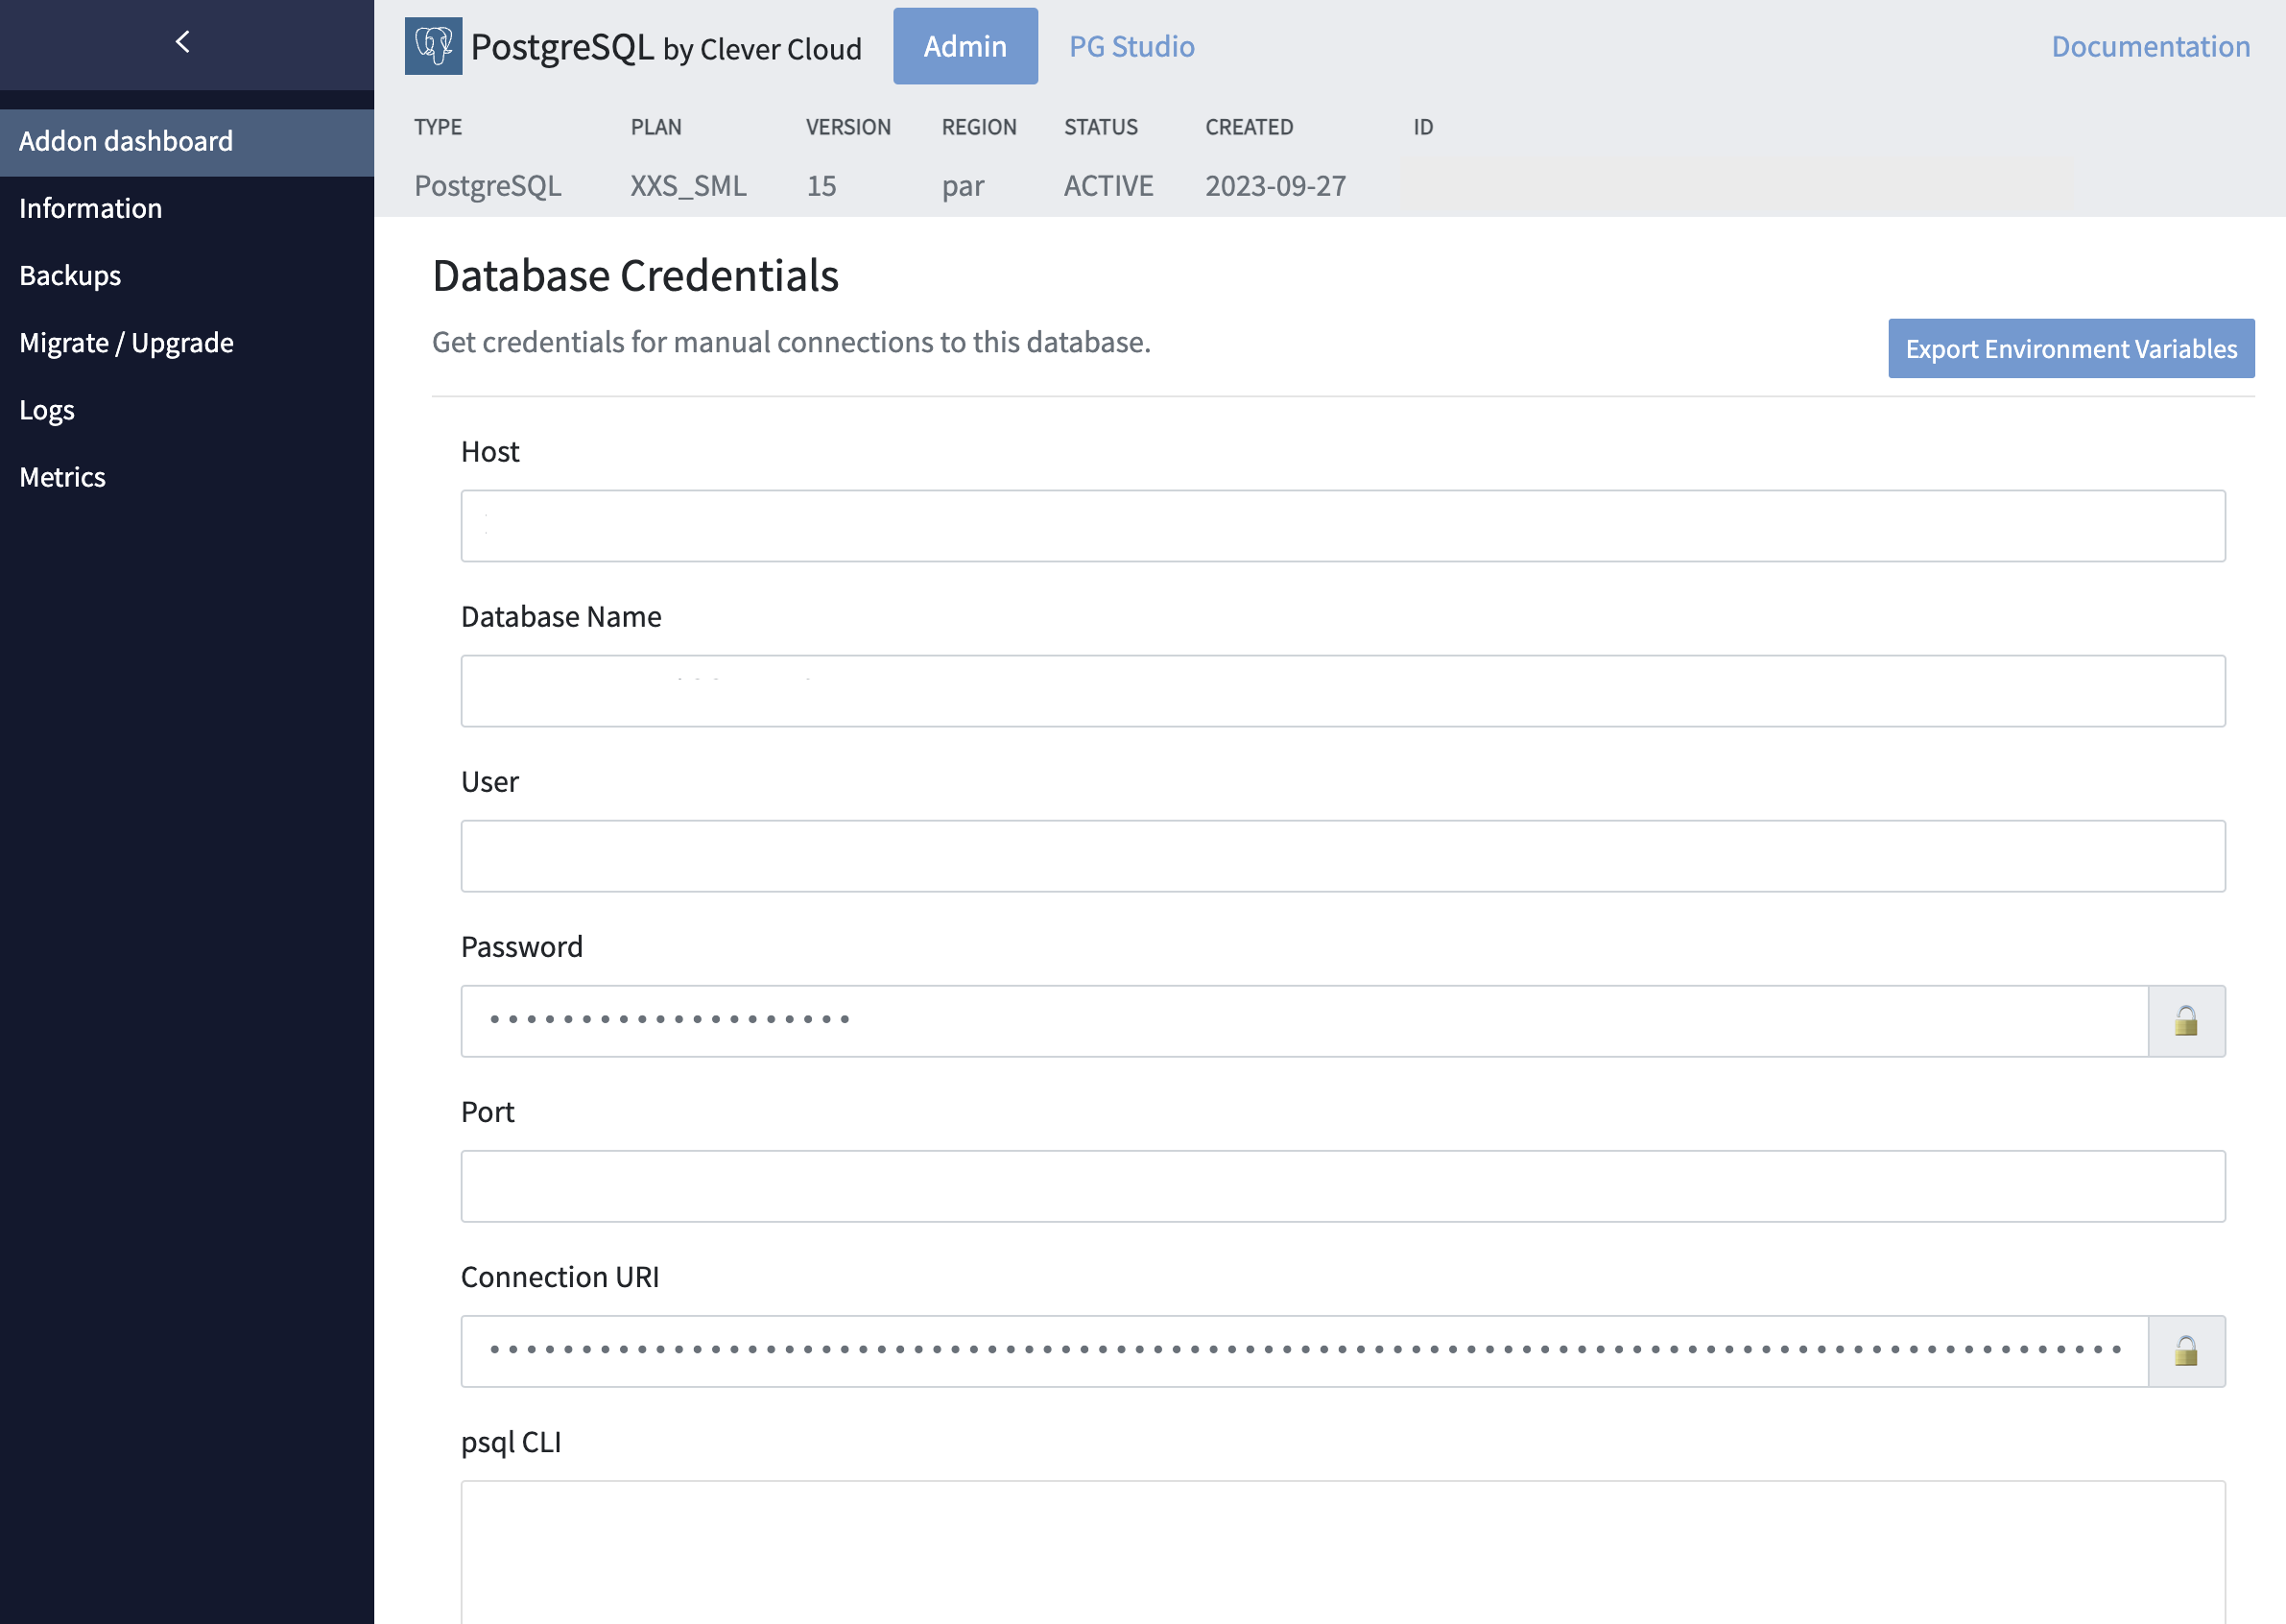
- Information tab: This screen sums-up the characteristics of the selected add-on. Features and environment variables (if applicable) are shown.
Other tabs may be available, depending on the add-on type.
Delete an add-on
To delete an add-on:
- Go to the Information tab of the add-on.
- Click on Remove add-on.